Showing posts with label Microservices. Show all posts

Thursday, August 3, 2023

Kafka messaging with Python & Polylith

This article isn't about Franz Kafka or his great novella The Metamorphosis, where the main character one day realizes that he has transformed into a Human-size Bug.

It is about a different kind of Kafka: Apache Kafka, with examples on how to get started producing & consuming messages with Python. All this in a Polylith Monorepo (hopefully without any of the bugs from that Franz Kafka novella).

This article can be seen as Part III of a series of posts about Python & Polylith. Previous ones are:

  1. GCP Cloud Functions with Python and Polylith
  2. Python FastAPI Microservices with Polylith

If you haven't heard about Polylith before, it's about Developer Experience, sharing code and keeping things simple. You will have all your Python code in a Monorepo, and develop things without the common Microservice trade offs. Have a look at the docs: Python tools for the Polylith Architecture

Edit: don't know what Kafka is? Have a look at the official Apache Kafka quickstart.

I will use the confluent-kafka library and have read up on the Confluent Getting Started Guide about writing message Producers & Consumers.

The Polylith Architecture encourages you to build features step-by-step, and you can choose from where to begin. I have an idea about producing events with Kafka when items have been stored or updated in a database, but how to actually solve it is a bit vague at the moment. What I do know is that I need a function that will produce a message based on input. So I'll begin there.

All code in a Polylith Workspace is referred to as bricks (just like when building with LEGO). I'll go ahead and create a Kafka brick. I am going to use the Python tooling for Polylith to create the brick.

Note: I already have a Workspace prepared, have a look at the docs for how to set up a Polylith Workspace. Full example at: python-polylith-example

The poly tool has created a kafka Python package, and placed it in the components folder. It lives in a top namespace that is used for all the bricks in this Polylith Workspace. I have set it to example here, but you would probably want an organizational name or similar as your top namespace.

bases/
components/
  example/ 
    kafka/
	  __init__.py
	  core.py

There's two types of bricks in Polylith: components and bases. A component is where you write the actual implementation of something. A base is the entry point of an app or service, such as the entry point(s) of a FastAPI microservice or the main function of a CLI. In short: a base is a thin layer between the outside world and the components (containing the features). I will develop the base for my new Kafka feature in a moment.

A Producer and a Consumer

For this example kafka component, I will use code from the Confluent Python guide (with a little bit of refactoring).

def produce(topic: str, key: str, value: str):
    producer = get_producer()

    producer.produce(topic, value, key, callback=_acked)

    producer.poll(10000)
    producer.flush()

Full example at: python-polylith-example

I'll go ahead and write a message consumer while I'm at it, and decide to also put the Consumer within the kafka component.

def consume(topic: str, callback: Callable):
    consumer = get_consumer()

    consumer.subscribe([topic])

    try:
        while True:
            msg = consumer.poll(1.0)

            if msg is None:
                continue

            if msg.error():
                logger.error(msg.error())
            else:
                topic, key, value = parse(msg)
                callback(topic, key, value)
    except KeyboardInterrupt:
        pass
    finally:
        consumer.close()

The kafka component now looks like this after some additional coding & refactoring:

kafka/
  __init__.py
  consumer.py
  core.py
  parser.py
  producer.py

Running a Kafka server locally

I continue following along with the Confluent guide to run Kafka locally, and have added a Docker Compose file. I am storing that one in the development folder of the Polylith workspace.

development/
  kafka/
    docker-compose.yml

I can now try out the Producer and Consumer in a REPL, making sure messages are correctly sent & received without any Kafkaesque situations (👴 🥁).

Producing a message

I already have a messaging API in my python-polylith-example repo, with endpoints for creating, reading, updating and deleting data. This is the acual service that I want to extend with Kafka messaging abilities. The service is built with FastAPI and the endpoints are found in a base.

base/
  example/
    message_api/
       __init__.py
       core.py
@app.post("/message/", response_model=int)
def create(content: str = Body()):
    return message.create(content)

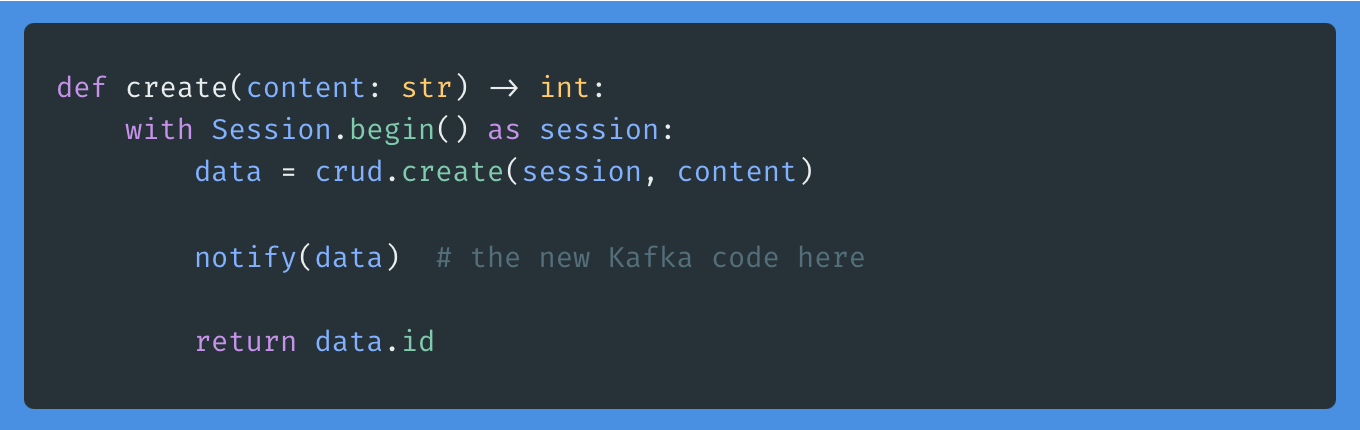
I'll continue the development, by adding the newly created kafka component. While developing, I realize that I need to transform the data into simple data structures - and remember that I already have a component that can be used here. This is where Polylith really shines: developing these kind of smaller bricks makes it easy to re-use them in other places - just by importing them.
Consuming messages

I have the kafka component with a consumer in it, and now is the time when I create a new base: the entry point for my kafka consumer.

This is the code I add to the base. Note the re-use of another already existing Polylith component (the log).

from example import kafka, log

logger = log.get_logger("Consumer-app-logger")


def parse_message(topic: str, key: str, value: str):
    logger.info(f"Consumed message with topic={topic}, key={key}, value={value}")


def main():
    topic = "message"
    kafka.consumer.consume(topic, parse_message)

Adding a project

I now have all code needed for this feature. What is left is to add the infrastructure for it, the actual deployable artifact. This command will create a new entry in the projects folder.

projects/
  consumer_project/
    pyproject.toml

I'm adding the dependencies and needed packages to the project-specific pyproject.toml file. But I am lazy, and will only add the base in the packages section - and then run poetry poly sync. It will add all needed bricks for this project. The poly tool has some magic in it, yes.

When deploying, just use the build-project command to package it properly without any relative paths, and use the built wheel to deploy it where you want it running. That's all!

In this article, I have written about the usage of Polylith when developing features and services, and Kafka messaging in specific. Adding new features & re-using existing code is a simple thing when working in a Polylith workspace. Don't hesitate to reach out if you have feedback or questions.

Additional info

Full example at: python-polylith-example
Docs about Polylith: Python tools for the Polylith Architecture

Top photo by Thomas Peham on Unsplash

Friday, July 21, 2023

Python FastAPI Microservices with Polylith

I like FastAPI. It's is a good choice for developing Python APIs. FastAPI has a modern feel to it, and is also easy to learn. When I think about it, I could say the same about Polylith.

Modern Python Microservices

Building Python services with FastAPI and Polylith is a pretty good combination. With FastAPI, you'll have a modern framework including tools like Pydantic. The simplicity of the Polylith Architecture - using bases & components - helps us build simple, maintainable, testable, and scalable services.

You will have a developer experience without the common Microservice struggles, such as code duplication or maintaining several different (possibly diverging) repositories.

Getting started

Okay, let's build something. I will write a simple CRUD service that will handle messages. Since I'm starting from a clean sheet, I can choose where to begin the actual coding. I'd like to start with writing a function in a message module, and will figure out the solution while coding. The Polylith tooling support (totally optional) will help me add new code according to the structure of architecture. I already have a Workspace prepared, have a look at the docs for how to set up a Polylith Workspace. Full example at: python-polylith-example

Great! Now I have a namespace package that is ready for coding. I'll continue with writing a create function. While working on it, I realize I need a persistent storage. I decide to try out SQLAlchemy and the Session thing.

def create(content: str) -> int:
    with Session.begin() as session:
        data = crud.create(session, content)
        return data.id

Again, I will use the poly tool to create a database component, where I will put all the SQLAlchemy setup along with a model and the function where data is added to the DB.

def create(session: Session, content: str) -> Message:
    data = Message(content=content)

    session.add(data)
    session.flush()

    return data

In this example, I will go for SQLite to keep things simple. Use your favorite data storage here.

from sqlalchemy import create_engine
from sqlalchemy.ext.declarative import declarative_base
from sqlalchemy.orm import sessionmaker

DATABASE_URL = "sqlite:///./sql_app.db"
DATABASE_ARGS = {"check_same_thread": False}

engine = create_engine(DATABASE_URL, connect_args=DATABASE_ARGS)
Session = sessionmaker(autocommit=False, autoflush=False, bind=engine)
Base = declarative_base()

I now have the basics done and am ready to write the endpoint.

I could (of course) also have started from the endpoint, if I wanted to. Polylith allows you to postpone design decisions until you are ready for it.

Before continuing, I will add the components to the packages section of the workspace pyproject.toml:

packages = [
    {include = "my_namespace/database", from = "components"},
    {include = "my_namespace/message", from = "components"},
]

The Base Plate

API endpoints are recommended to have in what is called a base in Polylith. The idea is very much like LEGO, when building things with bricks and place them on a base plate. Yes, the FastAPI endpoint is the base plate. I will create a new base with the poly tool, and add the FastAPI code in there. It will import the message component I wrote before, and consume the create function.

@app.post("/message/", response_model=int)
def create(content: str = Body()):
    return message.create(content)

Just as with the components, I will add the base to the packages section of the pyproject.toml:

{include = "my_namespace/message_api", from = "bases"},

I can now try out the API in the browser (I have already added the FastAPI dependency). Developing & trying out code is normally done from the development area (i.e. the root of the workspace). This is where you have all the things set up, all code and all dependencies in one single virtual environment. This is a really good thing for a nice Developer Experience.

Reusing existing code

I realize that I need something that will log what is happening in the service. Luckily, there's already a log component there that was added before, for a different service. I'll go ahead and import the logger into my endpoint and start logging.

✨ This is where Polylith really shines. ✨ The components that you develop are ready to be re-used already from start. There's no need to extract code into libraries or doing something additional. All previosly written components are already there, and you just add them to your project. You might think that the logger is a silly little thing? Yes, it is. But this is only a simple example of code that is shared between projects in a Polylith Workspace.

The Project

There's one important part missing, and that is the project. A project is the artifact that will be deployed. It is a package of all project-specific code, along with project-specific configuration. Using the poly tool and adding the base to the project-specific pyproject.toml. Note the relative path to the bases folder.

packages = [
    {include = "my_namespace/message_api", from = "../../bases"},
]

I'm feeling lazy and will use the poly tool to add the other needed bricks for this specific project (components and bases are often referred to as bricks). The poly tool will analyze the imports and add only the ones needed for this project when running the poetry poly sync command. There's also a check command available that will report any missing bricks.

You still need to add the third party dependencies, though. There's limits to the magic of the poly tool 🪄 🧙. To keep track on what is needed in the bricks, you can actually run poetry poly check again. It will notify about the usage of SQLAlchemy in the bricks. You can use the poly check command during development to guide you in the dependencies actually needed for this specific project.

Add sqlalchemy to the [tool.poetry.dependencies] section manually. You can update the lock-file for the project by running the builtin Poetry command:

poetry lock --directory projects/message_fastapi_project

All project-specific dependencies should now be set up properly! When packaging the project, simply run the poetry build-project (with --directory projects/my_message_fastapi_project if you run the command from the workspace root). You can use the built wheel to deploy the FastAPI service. It contains all the needed code, packaged and re-arranged without any relative paths.

What's in my Workspace?

Check the state of the workspace with poetry poly info command. You will get a nice overview of the added projects, bricks and the usage of bricks in each project.

In this article, I have written about the usage of Polylith when developing services. Adding new services is a simple thing when working in a Polylith workspace, and the tooling is there for a nice Developer Experience. Even if it sometimes might feel like a superpower, it's basically only about keeping things simple. Don't hesitate to reach out if you have feedback or questions.

Additional info

Full example at: python-polylith-example
Docs about Polylith: Python tools for the Polylith Architecture

Top photo by Yulia Matvienko on Unsplash

Sunday, March 10, 2019

Updates to the Apache ZooKeeper Node.js client

At last, Node.js is platform independent again!

Eh, what?

Apache Zookeeper?
From the docs: "... ZooKeeper is a distributed, open-source coordination service for distributed applications. It exposes a simple set of primitives that distributed applications can build upon to implement higher level services for synchronization, configuration maintenance, and groups and naming. It is designed to be easy to program to, and uses a data model styled after the familiar directory tree structure of file systems. It runs in Java and has bindings for both Java and C. ..."
(the docs)

A Node.js Zookeeper Client
You will find several Node.js implementations when browsing on npmjs.org, and one of them is simply called: zookeeper. Recently, I was added to the list of maintainers of the project, hosted on GitHub.

Background
The project got my attention when we at work were looking for a new ZooKeeper client, because the API of the current one we were using had gone out of date. We were all developing on Mac OS X, and pushed changes to a CI using a Linux docker container. Implementing the new client seemed like a breeze.

Until a developer in a peer team came by our spot at the office:
- Hey, I cloned the app repo and followed your setup guide. But I get errors when installing packages. I think it's the "zookeeper" dependency that fails. Do you know what's wrong?

We quickly learned it was because Windows. We realized that the entire build process - compiling C code to a native Node.js add-on on the fly - used non-Windows compliant features like make, bash and gcc.

Oh sh*t. How can this be solved?
What about bypassing it with Docker? I've learned that Docker on Windows can be painful, because of access right issues between a Windows host and Linux in a container. Windows Subsystem for Linux (WSL) would probably work after some tweaking, but adding WSL as a requirement to run (or develop) an app is ... well ... a bit depressing.

How about fixing the root cause of the problem, the source code? I did choose that path and have spent a lot of time learning about Node.js add-ons, (a little bit of) C and C++, Windows equivalents to bash commands, node-gyp, and how to compile the Apache Zookeeper C Client from source.

Months later, I hit the "Create Pull Request" button. Shortly after, the changes were merged and an updated npm package was published.

Besides supporting Windows, the zookeeper npm package also builds on Node.js 10. Previous versions failed, because the use of deprecated V8 features.

Details of recent changes can be found in the Changelog.

Contribute to the Open Source project
If you are interested in contributing, check out the issues tab at the GitHub repo. Currently there are some issues labeled with "good first issue", go ahead and grab one!