Wednesday, December 22, 2021

Simple Component Driven ClojureScript

That Component Driven thing

Component Driven is about developing user interfaces and apps in a certain way. In short, it is about grouping relevant code into components, combining compontents into features, combining features into views (or pages) - and combining the views into an app. I don't think it should be that much about the tools.

Just like Test Driven Development, Component Driven Development encourages us to start small. In a way, it also reminds of LEGO when combining building blocks into something useful.

As your app grows and the coding is done deeper into the app structure, developing user interfaces might be more of a challenge. Finding the spot where a new feature is to be added, might require some clicks and navigation. You know, stuff like logging in, a specific app state - or even waiting for data fetched from a third party service.

This is when the idea of Component Driven Development is really useful. To simplify and speed up the development, we need something simple to host our components. A UI that is isolated from any app specific state or dependencies. A place where a component can be rendered without the need to set things up. Having that, it is possible to develop a component in isolation and test it with different input.

Do I need a tool?

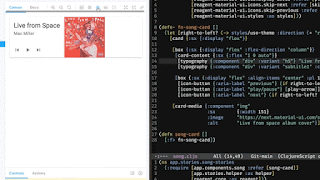
Storybook is a tool that will solve all of this, with a bunch of other really nice things like docs, previews, example usage, variants, code snippets and viewports. But it is possible to try out the Component Driven style of creating user interfaces, without going all-in with a new tool.

Start small

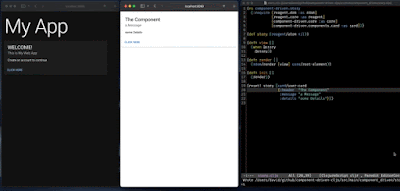
I’m suggesting a very simplistic approach, that will enable rendering components in a short-lived isolated view. You throw it away when done.

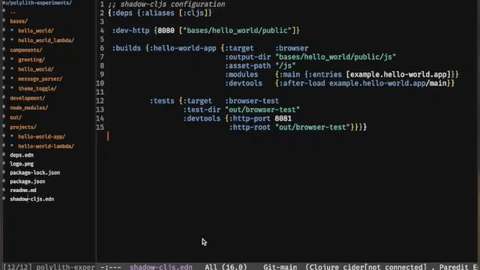
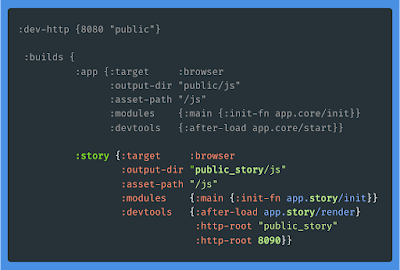
Here, I’m using shadow-cljs and have defined a new alias that is targeting a browser. I have also set entry points. A setup almost identical to the web app alias. This one will run in a separate port and the output is compiled to a separate public folder. In that one, I have copied the HTML template from the public folder used by the web app.

Click to enlarge the image, or browse an example gist here.

Keep it Simple

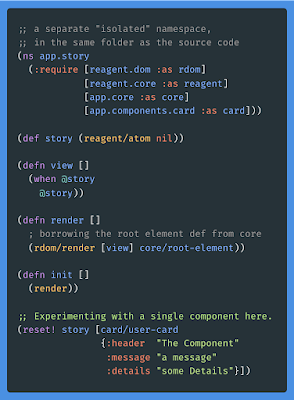
The entry point here is a simplistic and simplified version of the one used in the actual web app. But this entry point does only care about the component you are developing right now. Here is where you render and try out a component during development. This is a temporary place to work Component Driven. It’s almost like when evaluating code in a REPL, but with HTML and compiled JavaScript in a browser.

Click to enlarge the image, or browse an example gist here.

Run both aliases. The App in one browser folder, the component in a different one.

The browser is a powerful tool, with nice developer features.

Take it to the next level

At some point, you will probably want something more long-lived than this very simplistic scratch-style approach. That’s where Storybook fits in!

Component Driven ClojureScript with Storybook

With Storybook, you can focus on styling, different viewports and UI events when developing a single component. You write "stories" (i.e. running components in isolation), including documentation and lot of in-browser interactivity. The stories & docs can also be shared, by deploying it as a separate web app.

Recently, I talked about getting started with Storybook at the re:Clojure 2021 conference.

In this less than 25 minutes talk, I demo how you can use Storybook in your ClojureScript app and work Component Driven.

I hope you’ll like it!

Direct link to the Component Driven ClojureScript with Storybook video.


Top photo by Brett Jordan on Unsplash

Sunday, October 10, 2021

Functional Python

All in Functional

In a previous post, I had some concerns about doing too much functional programming in Python and that it might not be Pythonic. But I'm not going worry about that here. I'll be writing Functional Python, with some help from a very nice library called toolz.

I have added example code in this GitHub repo and have also recorded a short video (about 8 minutes long). You'll find it embedded in this post, just scroll down a bit.

Functional in a nutshell

The video is very much inspired by one of my favorite recordings about functional programming in general, and about Clojure in specific: Clojure in a nutshell (Func Prog Sweden), by James Trunk. I have learned a lot from that talk and figured it would be fun to copy the workflow and examples that James uses in his excellent talk.

So, I've been translating Clojure code to Python. You'll also notice in the short video that I'm practicing a thing called REPL Driven Development.

Pipe functions with the toolz.thread_last function.

Composing, piping, chaining, threading

What I've learned so far is that it's a smooth ride to apply functional concepts into a language like Python. After all, functions are first class citizens here. Composing functions in a minimalistic - and readable - way is joyful. Yeah, these things also encourage to aim for simplicity in functions. Keeping functions stateless, single purposed and testable. All of that is really good stuff.

Intuitive, Pythonic & Effective?

Are those one-liners, like that thread_last thing that I use heavily in the video, Pythonic? Well, I guess it depends. As with most things, the features of cool toolz should be used wisely.

Yes, Python should be used wisely.

Remember to run import this in a Python shell now and then to remind yourself about and reflect on the Zen of Python 🧘. Does it say anything at all about OOP, or functional?

Here's an improvised 8 minute recording with live coding functional Python, using toolz:

Direct link to the Functional Python video.


Top photo by Charlein Gracia on Unsplash

Friday, October 8, 2021

A Pythonic Railway?

What is Railway Oriented Programming, and how it can be implemented in Python? Is it even a good fit for Python?

🐍 Python on Rails

I’ve experimented with this Railway thing to find out if it is a good fit. If you haven't already, make sure to watch this excellent talk about Railway Oriented Programming from NDC London by Scott Wlaschin.

As I understand Railway Oriented Programming, it is about adding error handling to code without cluttering the program flow.

The source code in my GitHub repo is an attempt to implement a lightweight, and probably a sloppy, variant of Railway Oriented Programming in Python.

What I'm trying to achieve is to add the functional concepts of Railway Oriented Programming, and try keeping a Pythonic mindset. I believe that means not going all-in functional, but I could be wrong here. 🤔

🚂 Why Railways?

As I understand it, this way of writing code is about adding error handling and still keeping a happy path style in the code. This is done by wrapping - or as I’ve been doing, decorating - functions.

The functions are wrapped (or decorated, as in the examples in my GitHub repo) to catch failures. The output of a failed function call will be the input to the next one. The next function will choose a track based on the input: taking the success track, or the fail track. In general, taking the fail track means bypassing the function and skip to the next one.

By using a two-tracked approach in functions, the error handling will be separated from the program. Functions will be less cluttered with try except error handling and probably also with less of if else flow control clauses. As result, In many cases, this will mean less code in functions.

Less code in a function will probably be easier to understand and reason about. Less branches in a program flow will keep the functions simple. I think less is nice. Yeah, less is more. 😎

Here’s an improvised 5 minute video I’ve made to demo the concepts Railway Oriented Development in Python:

Direct link to the A Pythonic Railway? video.

I would love to hear your feedback about this!


Top photo by Alex Paganelli on Unsplash

Wednesday, September 29, 2021

Can we have that in Python too?

(REPL Driven Development)

REPL Driven what? 😐

REPL Driven Development is about fast feedback loops during development. It is not about typing code into a terminal window. Don’t do that. A Read Eval Print Loop (REPL) is often described as a shell tool that you use to try out a programming language. That’s not what I mean with REPL Driven Development.

What is it then?

With this workflow, the REPL is acting behind the scenes. You don’t have to type code in a shell. Yes, a Read Eval Print Loop process is running, but in an interactive mode. You do all the work in your code editor. That’s where you have autocomplete, syntax highlighting, your favorite color theme and everything.

⚡ The Workflow ⚡

The feedback loop is fast in REPL Driven Development. You evaluate code blocks and functions as soon as you have typed them. The result of an evaluation is printed out on your screen. A common thing with REPL Driven Development is to write some short lived code snippets next to the actual code that you are developing. With this, you are able to quickly run a function with some test data as input and verify the output.

This workflow is similar to Test Driven Development (TDD), but the feedback loop is much faster. After a while, you might discover that those code snippets should actually be a proper unit test. Well, wrap the code in a test function, move it to a separate file and your’e all good.

So, REPL Driven Development is lazy TDD?

Yeah, that’s probably right. Another way of looking at it might be that it is Test Driven Development Deluxe.

The Interactive REPL is an essential tool in the Clojure & ClojureScript ecosystems. It is a superpower I’ve not seen before anywhere else. Once learned, it is something you’ll want in other languages too. But is that even possible, outside of a Lisp environment?

Evaluating vars, state and functions in real time with ClojureScript

Can we have that in Python too?

I think I have found something similar to the Clojure way of writing software, that works really well. You can pass an entire buffer, a selected region or a function from the code editor into a running IPython process, that quickly evaluates the code and prints the result. I have replaced the standard Python shell with IPython. I’ll explain why.

When evaluating code, IPython will output the result while the cursor remains in the code editor. That is what I mean with fast feedback loops. Evaluated functions, variables and imports can also be redefined - without having to restart anything. I’ve configured IPython to auto-reload sub modules when changed, to avoid having to restart the process. That feature is essential for this kind of workflow and the main reason why I’ve switched out the standard Python shell.

REPL Driven development in Python

It would be really cool to have the output pop up in the editor, right next to the actual code (as when evaluating Clojure or ClojureScript). I think that’s mainly a tooling thing, currently not available.

Also, I haven’t yet figured out how to connect to an actual running Python program and redefine functions or variables while the program is running (as you do in Clojure).

However, IPython is closely related to Jupyter, often referred to as an interactive notebook. There’s a thing called the kernel, handling code evaluation and returning result to connected clients. Sounds a bit like NRepl & Cider! I should probably dig deeper into and learn more about the possibilities with Jupyter.

Joyful Python

To summarize, even though there are some limitations, I think the REPL Driven Development workflow makes writing Python code joyful. The fast feedback loop is a great thing to have at your fingertips. Just like TDD, REPL Driven Development can be very helpful when writing testable, simplistic and functional code.

And it is fun too. 😁

Update: have a look at this post of mine from 2022, for more info about how to setup your code editor. You'll also find a 5-minute video in there about this style of development.


Top photo by Hitesh Choudhary on Unsplash

Monday, September 13, 2021

ClojureScript. Amplified.

"… we're going to build a web app with storage, authentication and everything …"

But how?

My favorite building blocks 🤩

I have tried out some tools that I find very useful. As you may have guessed, the code is developed with ClojureScript. A language I appreciate more each day. Developing an app, without the Interactive REPL? That would be taking a huge step backwards.

I have found that Material-UI works really well in the development of the app I'm working on. The components library cover many usage scenarios, it is well documented and there's a lot of code examples to learn from.

Recently, I added Storybook and really like the idea of developing user interfaces according to Component Driven Design. It reminds me of how I experiment with code using Test Driven Development. Just like TDD, I think tools like Storybook and Devcards changes the way we develop, to the better. Start small & build quality in.

Let's begin with a building block from my favorites list: AWS Amplify.

A basic setup for AWS Amplify & ClojureScript

The official AWS Amplify documentation is all about JavaScript. In this post, and in this example code repo, you will find a ClojureScript setup that I think will get you up & running quickly. First, set up AWS Amplify by following the first parts of the Official getting started guide. You will be creating an AWS account and installing a CLI to initialize your setup.

If want more details, have a look at Hey Webpack, Hey ClojureScript. It's a post describing a ClojureScript & Amplify specific setup that is used in the example repo.

Start coding, but where? 🤔

A pitfall might be where to place the auto generated client code from Amplify. I usually put files like the aws-exports.js at the same level as the root namespace.

In the example code repo, the ClojureScript source code lives in the src/main folder. That's also where I've added the aws-exports.js file.

Configure Amplify in the init function of your app.

Login & Logout with ClojureScript & the Amplify CLI

Adding authentication can easily be done by using the Amplify CLI.

From the docs:

"... The Amplify CLI supports configuring many different Authentication and Authorization workflows, including simple and advanced configurations of the login options, triggering Lambda functions during different lifecycle events, and administrative actions which you can optionally expose to your applications ..."

Use the Auth features in Amplify UI

There's a very useful Higher-Order React Component (aka HOC) in the AWS Amplify UI Library, that will render login and signup views.

I've chosen this less-lines-of-code approach by using the withAuthenticator HOC. To customize things like signup fields or styling, there is also a fully customizable Authorization component available in the Amplify UI library. Or you can use your own components.

The views entry point.
The passed in component is wrapped in the withAuthenticator HOC.

If you already have browsed the code in my example repo, you may have noticed the Reagent reactify-component and as-element functions. These functions are needed when passing components between ClojureScript and JavaScript.

Read more about React Components, elements and instances and how the interop is done with Reagent.

Create, read, update and delete

So far, we have used built in features that will render UI views and handle all auth communication with a backend service. To store, read and update data, we can use the Amplify API feature. Use the CLI to create a backend:

I have chosen GraphQL in my example code, but there's also a REST API option. When using GraphQL, all you need to do is to define data models. Amplify will create the backend infrastructure according to your models. In a matter of minutes, there are AWS AppSync endpoints & DynamoDB tables created for your app.

GraphQL

Here's a GraphQL model. An authenticated user should be able to add data to the profile, like a summary or an "About me" text. The user will be able to create, delete and update the data in the profile. Other authenticated users can read the data when they visit the user's profile.

The schema files belongs to the backend, and lives in the amplify folder of your repo.

async ClojureScript

The Amplify Client Library handles the communication with the backend services. All calls are asynchronous. In ClojureScript, you can use core.async. I haven't yet dig into the core.async stuff, so I'm using Promises here. I think it's a quite straight forward approach.

The data going through the wire is JSON. To make the developer experience better, I think it might be a good idea to add conversion functions to-and-from Clojure data structures. Like this one, converting user settings JSON to Clojure data:

Read more about the ^js type hints in ClojureScript.

Finally: Ship it! 🚢

Here's an excerpt from an amplify.yml that defines the build steps. If you add a definition file in your repo, AWS Amplify will use it in the CI/CD process.

This is the amplify.yml that I use in my example code repo.

There's more details at the official AWS docs about build settings and about amazon-linux-install.

Add UI building blocks to the amplified app

Now we have our amplified ClojureScript app. Let's add UI building blocks from Material-UI, a library that is very popular in the JavaScript & React ecosystem. Here, I'm using it via a ClojureScript library called reagent-material-ui. The library makes it possible to write components using Clojure data structures. You can read more about Material-UI and ClojureScript in my previous post Material Design in a Functional World.

Totally unnecessary css styling used here, but why not?

Testing the UI building blocks with ✨ Storybook ✨

I find Storybook very useful when experimenting with components and user interfaces in isolation. Being able to focus on one specific thing. There's many different aspects of developing an app, and it is sometimes difficult to handle all of them at the same time.

Storybook is a place for trying out things like css, styling, different viewports and UI events. You won't try out the AWS Amplify code here. The Interactive REPL is a better tool for that.

You'll find more about Storybook in Component Driven ClojureScript with Storybook.

Finally, check out my GitHub repo for ideas on how to create apps with the building blocks AWS Amplify, Material-UI, Storybook and ClojureScript.

That's a combination I'd like to call ✨ClojureScript. Amplified. ✨


Top photo by Drew Patrick Miller on Unsplash

Thursday, September 2, 2021

Material Design in a Functional World

"... Material is a design system created by Google to help teams build high-quality digital experiences for Android, iOS, Flutter, and the web ..."
from material.io

ClojureScript & React is A 💕 Story

With Clojure, you can write functional & minimalistic code. With ClojureScript and Reagent, you can write functional & minimalistic React components. By adding re-frame to it, we also have a powerful way of handling state changes and triggering events.

The code you write in ClojureScript is instantly compiled to JavaScript React components that runs in your browser. The entire JavaScript ecosystem is available with this kind of setup.

"... React components for faster and easier web development. ..."
from material-ui.com

Material-UI

Material-UI is a very popular React framework. And we can use it with ClojureScript. But the JavaScript interop can sometimes be bit of a hassle. Fortunately, there is a great ClojureScript library called reagent-material-ui that simplifies this a lot.

One thing to notice is that the Material-UI components use React Hooks heavily to inject styling and theming into components. This is something to think about when using Reagent. Basically, just use the functional component syntax [:f> my-component] and you’re all good.

Have a look at the reagent-material-ui docs about common pitfalls in the React/Reagent interop and a fully working example in this GitHub repo.

Storybook: a playground for components

Here’s me playing around with the Card component, using ClojureScript and Storybook. I describe the Storybook integration in detail in this post.

The source code is available at GitHub.

No copy-paste?

I guess it can be a bit overwhelming for a Clojure developer to look at example code from the Material-UI site, with JavaScript/JSX syntax that is quite verbose (you’ll be even more overwhelmed by the TypeScript examples).

A JavaScript developer would probably copy-paste the example code and make some adjustments. We can’t do that. But it is worth the effort writing the code from scratch when discovering that the result is way more simplistic than the original. The amount of code written is usually half the size of the original JavaScript code. Yeah, that’s Clojure!

ClojureScript to the left, JavaScript to the right. Less is more.

Check out my GitHub repo with examples on how you can implement Material-UI components in ClojureScript, with hooks and styles - while having fun writing functional code.


Top photo by Thierry Lemaitre on Unsplash

Tuesday, August 31, 2021

Component Driven ClojureScript with Storybook

Component Driven?

Start small. Develop components in isolation. Don’t forget to pause & reflect on the code you’ve written. Can it be split into several small components?

✨ When you’re ready, combine your components to create features.

✨ Add the features to a view.

✨ Add the view to your app.

You can read more about Component Driven User Interfaces here.

Storybook

I’ve just begun to use Storybook and currently learning about it. What I especially like so far, is that the tool encourages you to write UI components that are independent … and functional?

This makes it possible to develop user interfaces in isolation. Just pass data and actions as parameters into your components. Keep it simple. This way of working reminds me a lot of Polylith, an architecture I have used in backend focused Clojure projects and that I enjoy a lot.

ClojureScript & Storybook?

You will find a fully working example in this repo. I have added Storybook to a ClojureScript web app, using shadow-cljs, with additional npm scripts located in package.json.

Update: a new version of shadow-cljs supports ns-regexp for the npm-module target. No need to manually add new stories!

The code in my GitHub repo is a continuation of the work I’ve described in an earlier post, about combining shadow-cljs with Webpack and AWS Amplify.

The Clojure Interactive REPL and Storybook working well together.

No JavaScript quirks?

Well, yeah some. The JavaScript ecosystem is evolving fast, tools are updated with breaking changes and sometimes that causes compatibility issues. In this case it is Storybook and Webpack 5. But I have solved it with a few extra rows of configuration. Don’t worry.

An example of a Storybook story written in ClojureScript

Have a look at the fully working example at GitHub.

Many thanks to Shaolang Ai, that wrote this blog post about shadow-cljs and Storybook that I’ve learned a lot from.


Top photo by Etienne Girardet on Unsplash

Sunday, August 29, 2021

Hey Webpack, Hey ClojureScript

✅ ClojureScript is great.

✅ AWS Amplify is great.

🤔 Why are there errors in my browser console?

ClojureScript. Amplified.

Some time ago, I decided to give AWS Amplify a try for a new project. With Amplify, you can quickly create and deploy web apps and AWS backend services by using your command line.

Even though the Amplify code examples and docs are all about JavaScript, I wasn't too keen on abandoning my favorite REPL powered language: Clojure. 🤩

So, I decided to combine two great things: AWS Amplify & ClojureScript!

Amplifed, yes. But with 🔔.

I have learned a lot from this blog post by Robert J Berger about how to setup AWS Amplify with ClojureScript. New versions of the AWS Amplify libraries are released regurarly. The current Major version include breaking changes that probably will cause ClojureScript web apps to raise errors and stop working.

Until recently, I have had to rollback updates and use earlier versions of the Amplify libraries. Nothing wrong with that. But my inner Alarm Bells have been ringing constantly since noticing the word legacy in the official Amplify docs for those library versions (the aws-amplify-react library and the Amplify Auth feature in particular).

The newer Amplify libraries rely on Webpack specific features under the hood. The example setup described in the official Amplify docs include using react-scripts, that (if I'm not mistaking) will package code with Webpack. That kind of setup is not supported by shadow-cljs, a tool that is very common in ClojureScript projects.

Breaking things

In addition to being stuck using legacy code, the app will break each time I add a third party library from npm. I have learned that it is caused by not having a fixed version for amplify libraries defined in my package.json file. A quick fix is to set all AWS Amplify libraries to a fixed version and use that one forever. A version that is becoming more legacy for each day. 🔔🔔🔔

Fix the broken things

The main issue with AWS Amplify libraries, ClojureScript and shadow-cljs is described in this GitHub thread. There is also a suggested solution hinted by Thomas Heller, the creator of shadow-cljs.

A solution: shadow-cljs & Webpack working together

I have created an example app using AWS Amplify and ClojureScript in this repo. Here, shadow-cljs will only create a target JavaScript file containing requires to all of the third party JavaScript dependencies.

Webpack will use that target to create a JavaScript bundle. In a continuous deploy environment, this can easily be automated by executing two scripts instead of one (the shadow-cljs build and webpack).

This solution makes it possible to use the very latest versions of the AWS Amplify libraries, without any css quirks or being forced to use legacy code. Hey Webpack, Hey ClojureScript!

Nowadays, my inner alarm bells are nice & quiet.

Photo by Kamil Pietrzak on Unsplash

Sunday, April 18, 2021

Confessions of an Open Source Contributor

I am one of the contributors to an Open Source project called zookeeper. It's an Apache ZooKeeper client made for Node.js. You can find the package on npm and the source code at GitHub.

What’s ZooKeeper?

"Apache ZooKeeper ... providing configuration information, naming, synchronization and group services over large clusters in distributed systems ..."

In short, Apache ZooKeeper is made of two parts: a service, and clients that communicate with it. Included in the packaging from Apache, there is a client made for the Java platform and also a C based client. You will most likely find one for your favorite language out there as a third party Open Source project.

Why joining Open Source?

A couple of years ago, I was part of a team in an organisation that use Apache ZooKeeper heavily. The team maintains a Node.js based app that communicates with a ZooKeeper service.

One day, the app began to raise strange warnings and unexpected errors. We looked into it and found out that the reason was probably caused by the client no longer being compatible with the API of the service.

There wasn't much happening in the client's repository:
unanswered questions from users, issues not taken care of and pull requests not being reviewed.

The project was abandoned.

So, we used a different client that seemed fairly updated and stable. The strange behavior in our app was now gone. Great! It worked on our machines and in production. All good!


🙋"Hey, team. I can't install your app on my Windows machine."

Sometimes other teams need to run our app locally for testing and such things. It turned out that our new client didn't support Windows at all.

Wait a minute, isn't Node.js supported in all major platforms? Well, yes. But this one is building a Native Node.js AddOn using bash scripts. Windows don't have that.

🤦‍♂️

Even though it wasn't my fault only, all I could think of is that it was my fault. I have ruined it for the teams at this workplace.

What else to do than try fix it on my spare time? So, I grabbed the source code to try to understand what's going on behind the scenes.

😭


And that's how my Open Source journey began: triggered by guilt and feeling ashamed.

Coding in the Dark

Late nights and weekends were spent trying to figure out how to solve this huge problem, including C/C++ code, CMake, bash and node-gyp.

One day, I figured it out. I had succeeded in making it work on Mac OS X, Linux and on Windows! The next day - a sunny morning in beautiful Stockholm - I went to the office smiling. Exhausted by the lack of sleep, but happy.

😎


Do I have to fix everything? 😟

While struggling with the source code, I realized there were more things that should be fixed. By then, I also realized that this Open Source project suffered from similar issues as the one we had replaced earlier: there wasn't really that much activity in the repo.

This is probably a common pattern: you work with something on a daily basis and contribute to Open Source projects. The years go by, you drift way from the project, simply because you now work with other things unrelated to the project.

How to maintain an Open Source project

Instead of grabbing the next task to spend late nights and weekends with, I decided to learn more about how to maintain Open Source projects.

I found a very useful guideline at GitHub, and I began to add notes about all kinds of things I thought should be done. Other Open Source projects were using labels in a way that I liked, so I added labels like help-wanted and good-first-issue to most of the tasks.

I think labels can help people getting an overview of the tasks and to understand the degree of difficulty.

Every time a question comes up, or someone is filing a bug report, I have replied to most of them within a day or two. I think this is important. The person reporting will know there is someone that has actually received and read the message.

As a result, really nice things have happened. The project has received Pull Requests from people located all over the world. Solving a broad variation of things from typos in the docs, to rewrites of the source code to modern JavaScript.

What's happening today?

Today, I think the project is stable and working well. I don't work nights or weekends. Even though I have moved on and no longer work with ZooKeeper as before, the feedback from users is my main inspiration to keep on working. Also, the amount of users of the client looks pretty good.

It inspires me to do the best I can with the project.


Photo by Justin Lim on Unsplash

Sunday, April 11, 2021

Almost like Clojure

Practicing different programming languages has given me new insights in programming concepts, code styles and tools. My current crush is Clojure. I like the functional and data oriented style of it, the simplicity and minimalism. I think my favorite thing with Clojure, though, is how the REPL is used.

“What’s so cool about that repple thing?” 🧐

Testing at your fingertips 🚦

When using a code editor powered by a REPL, you can instantly evaluate variables, code blocks, functions or the entire file, just by a hitting a key combination. The result pops up right next to the cursor. This means that testing the code you currently write is at your fingertips. You are practicing a Deluxe version of Test Driven Development.

No copy-paste here 👮

It is not necessary to copy-paste code snippets into the actual REPL window or in a shell. In fact, you shouldn’t touch the REPL window at all. Because you don’t want to miss out on all the good stuff like autocomplete, hints and smart navigation that you have in your favorite editor.

For Clojurians only? 💭

I really would like to have a similar workflow in other languages too. It turns out there are some pretty good tools out there, the ones I’ve tried out so far are for JavaScript and ✨Emacs ✨.


Interactive JavaScript development 😍

Here’s me playing around with the node-zookeeper code. The cursor never leaves the editor window, the evaluation result is printed out in the Node.js REPL window to the right. More verbose than I’m used too in Clojure, but I think it works well.

Trying out code and ideas like this is a very nice workflow. I think you will find less need for debugging or console.log statements.

Keep on learning 📚

Learning a new programming language or tool can be really difficult, but also fun when the pieces finally start coming together. The knowledge gathered is something you can bring with you to other areas.


Have a look at my post about Emacs and my current configuration. The Node.js REPL feature is made possible using the js-comint package.

Photo by Marc-Olivier Jodoin on Unsplash

Sunday, April 4, 2021

Software as building blocks

There seems to be an ongoing trend in software development towards using monorepos. This trend is something I have seen especially in the Clojure community.

Polylith - a monorepo architecture

I like the way Polylith solves how to work with code using a components-first architecture. Similar to LEGO, components are building blocks. A component can be shared across apps, tools, libraries, serverless functions and services.

Read more here: Polylith gitbook

The last architecture you will ever need *

From the Polylith docs:

"... Polylith is a software architecture that applies functional thinking at the system scale. It helps us build simple, maintainable, testable, and scalable backend systems. ..."

Okay, backend systems. What about frontend systems? 🤔

I want to Polylith all the things

Is it possible to use the Polylith architecture for a code base that includes web apps? This is something that I have wanted to find out.

Here's my example repo.

In this repo, I’ve added backend Clojure code, frontend ClojureScript and also some glue in between in the form of cljc files. Cljc is Clojure code that can be consumed by both frontend and backend code. This makes it possible to share code across Clojure and ClojureScript, building things just like with LEGO bricks and baseplates.

All the things?

I'll leave the question if ClojureScript and Clojure really should live in the same ecosystem unanswered and hope to get feedback from you. In my example repo, I have put all components in the same place. Should the building blocks be separated somehow, or is it good enough to have both LEGO and DUPLO in the same box? What are your thoughts about it?

Do we still have the Polylith one-REPL experience?

Well, we can have a two-REPLs experience. One for Clojure, that run on top of the JVM, and one for ClojureScript on top of JavaScript. Running both will make REPL driven backend development and Interactive Web Development possible.

You can add and use new ClojureScript components while the REPL is running. Create the namespace and evaluate the function.

There is one thing that I have no solution for (yet). When creating a new ClojureScript component and evaluating the entire namespace at once, I get a compilation error in the ClojureScript REPL: file not on classpath. The ClojureScript REPL have to be restarted to reload new source paths.

But don't worry, you can still evaluate the individual functions in the namespace and they will be loaded as expected in the ClojureScript REPL.

Tooling support

Polylith has a very nice and useful tool to support creating building blocks and to verify the setup. You can create components, bases and projects - as long as it is Clojure. For ClojureScript, you will have to create components manually.

If you are lazy, like me, just create a component with the poly tool as you would for Clojure, and simply rename the file extension to cljs or cljc afterwards.

Editor support?

Your editor most likely has support for running both Clojure and ClojureScript simultaneously. Emacs is my favourite editor. Start the REPLs with the cider-jack-in-clj&cljs command and you're ready to go!

Two REPLS running (even though the Cider splash message is confusing)

* The quote is from Joakim Tengstrands and Furkan Bayraktars talk about Polylith at the FuncProg Sweden 2020 meetup.

Photo by Amélie Mourichon on Unsplash

Sunday, March 14, 2021

Wake up, sleepy lambda

AWS Lambda functions with painfully slow start up times is a problem. But there's hope.

Clojure anywhere

After going through some of the 12 Stages of learning Clojure, I have found this Lisp style language to be very nice and it has become my favorite programming language.

Some of the nice things with Clojure are that data is immutable, the REPL is like magic and the code you write looks minimalistic. Also, you can run Clojure code almost anywhere: as backend services, web frontends and even in shell scripts.

Even in Lambda functions?

I found out that it is not that difficult to make Clojure code to also run in AWS Lambda. The code can live in a Java runtime. Lambda events will be routed to a handler function written in Clojure, when the namespace implements a Java Request handler class (here's an example). Yes, there is some interop needed at the entry point of the Lambda code to make it work. But don't worry.

In addition to the Java interop, the source code should also be ahead-of-time compiled and packaged. I've used the uberdeps library that will make the process smooth when using tools.deps.

If you are not familiar with the Java lingo (like me, I have a background in Node.js, frontend and .NET), words like jar, AOT and even Java can be intimidating. I guess it is possible to sidestep all of this by writing the Lambda function in ClojureScript and run it in a Node.js runtime. But I don't want to opt out of the rich ecosystem of Clojure libraries built for the server side.

Sleepy lambda, slow cold starts

It seems that a Lambda running in a Java or .NET runtime often has painfully slow start up times. Setting a timeout of 3 seconds is probably not even enough. A simplistic solution to this problem is to use the AWS provisioned concurrency with a Lambda alias. No code changes required, only configuration and money. I wanted to find out if there are other ways to solve this problem.

What about GraalVM?

I found this great post about Clojure and Lambda written by Esko Luntola. Code that is compiled with GraalVM and running in Docker, solving the issues with slow cold starts and even makes requests in general super fast. Wow!

However, I haven't succeeded in going through the steps described in the post and am stuck in build failures that I don't know how to solve - yet. But I will try this approach some more. Even though it requires some initial setup with configs and Docker containers, this seems to be the way to go.

What about GraalVM in a custom runtime?

When digging deeper in how to run code in AWS Lambda, I found out that you can create your own runtime. To me, this approach looks simplistic and straight forward.

In this repo, I have written a Hello World example with:

  • a custom runtime (the file called bootstrap) written in bash (grabbed from the AWS Official docs with some additional error handling).
  • Clojure code, with a main function as the entry point. It is not neccessary to implement the Java Request handler class, and the main function returns data via standard output.

Input args as a JSON string

The Clojure code is compiled, and built with GraalVM by using the Native Image feature. Have a look at the Makefile for details.


compile and build with GraalVM Native Image
I've tried to keep things simple and followed the guides at clj-graal-docs and watched Michiel Borkents excellent beginners guide to GraalVM on YouTube.

The custom runtime and the function can be deployed separately. You can reuse the same runtime for several Lambda functions, by creating a Lambda Layer in AWS. The function code can be deployed directly, just upload the zipped file to AWS Lambda.

I like this approach, it works fine in my simplistic hello world example. But I haven't tried it in a real-world scenario. When going beyond an experiment, I think there might be additional resource configuration flags to Native Image required. Probably the setting ReflectionConfigurationFiles.

The tradeoffs?

From what I can see in my totally non-scientific weekend experimental testing is that the code running in my Custom Runtime has a cold start of somewhere between 100 and 300 milliseconds. Good enough. When warmed up, requests are processed between 15-30 milliseconds. Not bad.

When comparing with my other example lambda that is running in a Java runtime (with cold starts usually taking over 2000 milliseconds), the Custom Runtime with GraalVM is way faster.

But once warmed up, the Java runtime is actually super fast, with duration times between 1 - 30 milliseconds. Also, I haven't yet solved how to build all of this in a CI/CD setup. The code was built with GraalVM locally on my machine.

I would very much appreciate your input on the experiments shared in this blog post.


Photo by Abdelrahman Hassanein on Unsplash

Saturday, February 27, 2021

Interactive Web Development

The workflow for developing web apps has been very much the same for quite some time, even if the tools have evolved and the programming languages have changed.

Write some code, save the file, switch to the browser window, hit the refresh button and wait.

Sometimes there has even been a couple of extra steps in between: write, save, compile, restart, switch to the browser, refresh, wait and repeat. The problem with this is that - at least for me - the focus on the actual problem to solve is paused or even worse: lost.

"Write code,
Switch to the browser window,
Hit the refresh button,
Wait ...
Now, where was I?"

But there’s hope!

🔥 Hot Reloading

With a modern development environment, you can use automation to get rid of some of the noice. Your code editor can probably be configured to detect when a file has changed and automatically save it.

With tools like Webpack for JavaScript and Shadow-cljs for ClojureScript, you can reload a running development web server - even replace code while the web server is running without loosing the current state. This is often called Hot Reloading and makes the development workflow a lot smoother than before. Very cool.

🧱 Building blocks

I really like the way React has solved problems with web development in general. React simplifies how you can separate features into components. At the same time, it promotes grouping relevant markup and code, by combining JavaScript & HTML into the JSX syntax. I think helps with keeping focus on the actual problem solving, with less navigating and flipping between files in the code editor. Good stuff.

♻️ The Virtual DOM

The Virtual DOM will give instant feedback when data has changed. The DOM is changed on the fly, without the need for page reloads or server side rendering. This is done by calculating the current state of the browser DOM and an in-memory copy of it. When there is a change in the copy, the relevant parts of the browser DOM will change. Really nice.

🦄 The Developer Superpower

Recently, I’ve learned about a really cool workflow called REPL Driven Development. I have used a REPL before, but have always thought of it as something that is used in a shell for some quick testing, not in the actual code editor. But with Clojure, this is the way we work. While you are in the editor, thinking, writing and looking at the code, you can evaluate it and get instant feedback. You can trigger events, browse state and even query the browser DOM! This is possible thanks to the Interactive REPL.

It’s almost like Magic. 🤩

I think this is unique to Clojure and ClojureScript. I’m not sure why this superpower doesn’t seem to exist elsewhere, but it probably has something to do with the structure of the language itself: code and data share structure and syntax.


✨This is Interactive Web Development

By combining hot reloading, building blocks & the virtual DOM with the Interactive REPL - we have something that I would like to call Interactive Web Development.

Arrange your code editor side-to-side with a browser window, to get instant feedback from both the user interface and the functionality when evaluating and experimenting with the code during development.


Photo at the top by Nong Vang on Unsplash

Have a look at my Func Prog Sweden second 2021 talk at YouTube that is covering this topic too. Direct link: ClojureScript: React with a Hiccup

Sunday, February 14, 2021

Test Driven Development Deluxe

You have probably already heard about the red-green-refactor workflow when practicing Test Driven Development: start with a failing test, make the test pass, refactor and repeat.

I don’t think I have ever been very strict about the TDD workflow. I usually jump back and forth between the code and the unit test, often begin with trying out naming of functions and less-important things like that. I also find refactoring difficult at that stage, probably because the goal is to write code that does something and that does it well enough. I find it much easier to reflect and come up with refactoring ideas once I see a Pull Request diff on GitHub.

Too much context switch

Until recently, I have failed to find a workflow that is seamless when writing, running and testing code. There is often context switching involved: executing commands that run tests in a terminal or navigating the test runner of an IDE. Sometimes that means a pause with a delay of seconds, or even minutes. The eyes and the brain have lost attention to the code. The focus and flow is gone. Now where was I?

What would Clojure do?

These days, the programming language that makes me 🤩 is Clojure. It has been quite a journey learning how to use the language and how to use the code editor properly. I guess most of us don’t pick up all the good parts of a language or a tool immediately. It takes a while to get there.

An example: my brain hasn’t had the bandwidth enough to get how to use the interactive REPL until recently. There has been a lot of other things to unpack: language syntax, functional programming concepts and keyboard shortcuts. On a positive note: there are opportunities for daily learning and that’s where I am today.

- Wow, I can evaluate an expression in the code editor and the result pops up right next to it!

Star struck. 🤩

The other day I was frustrated with the slow feedback from a CLI test command running in a terminal window. I guess it has something to do with the Java Virtual Machine starting up every time a command is executed. I’ve tried out tools with file watchers, reacting to changes, that speed things up - but there’s still context switching involved, moving your eyes off the editor & the code.

What would a Clojurist do? I think the answer would be:
- Use the REPL.

The REPL, you must use

With Clojure, using the REPL means writing code in the editor, with autocomplete and everything. Also, evaluating the code while in the editor. There is no need to write a statement in a separate terminal window. Your editor has a connection to the interactive REPL (a running server), that will evaluate your code and return the result back to you. With the interactive REPL, you can quickly try things out, without switching to a different tool or view.

This is what some people call REPL Driven Development. Before I learned about it, I have always thought of a REPL as something that is used in a terminal window, away from the editor and away from the code.

the interactive REPL in action

Development Deluxe

By combining REPL Driven & Test Driven Development we have a setup that solves the issues with context switching and slow test runs. From what I’ve learned and tried out so far, I think it is a very nice workflow. 🤩

A very nice workflow

With REPL Driven Development, you write code, evaluate it and get instant feedback while keeping your focus on the code. Maybe the quick visual feedback in the editor is good enough to continue working? Great. Or, you write one or two commands wrapped in a runnable Clojure (comment) block just below the functions, to simplify the evaluation.

Everyone needs a coffee break. Commit the code (yes, the commands too) and continue with it later. ☕

Take a break

Your brain has been charged and you feel refreshed again. When returning to the code, you realize that the commands are probably evolving into something similar to a unit test. Should it be a proper unit test? If so, wrap it in a (deftest) function with some assertions and put it in a separate file.

Here’s a tip: give the unit test the same namespace as the actual code, but add a -test suffix to it. When doing so, your code editor (if it is smart) can run the corresponding tests when in a namespace. If you are an Emacs user, simply press the keys C-c C-t n to run the tests.


Even though you have put the unit tests in a separate file, in a separate folder, there is no need to switch context. Your tests run from where you are and you get instant feedback on the result. Very cool.

I think this is Test Driven Development Deluxe. 🤩


Photo by Felipe Giacometti on Unsplash.

The screenshots are from email-attachments - A Clojure library that makes extracting attachments from email simple.