Wednesday, September 29, 2021

Can we have that in Python too?

(REPL Driven Development)

REPL Driven what? 😐

REPL Driven Development is about fast feedback loops during development. It is not about typing code into a terminal window. Don’t do that. A Read Eval Print Loop (REPL) is often described as a shell tool that you use to try out a programming language. That’s not what I mean with REPL Driven Development.

What is it then?

With this workflow, the REPL is acting behind the scenes. You don’t have to type code in a shell. Yes, a Read Eval Print Loop process is running, but in an interactive mode. You do all the work in your code editor. That’s where you have autocomplete, syntax highlighting, your favorite color theme and everything.

⚡ The Workflow ⚡

The feedback loop is fast in REPL Driven Development. You evaluate code blocks and functions as soon as you have typed them. The result of an evaluation is printed out on your screen. A common thing with REPL Driven Development is to write some short lived code snippets next to the actual code that you are developing. With this, you are able to quickly run a function with some test data as input and verify the output.

This workflow is similar to Test Driven Development (TDD), but the feedback loop is much faster. After a while, you might discover that those code snippets should actually be a proper unit test. Well, wrap the code in a test function, move it to a separate file and your’e all good.

So, REPL Driven Development is lazy TDD?

Yeah, that’s probably right. Another way of looking at it might be that it is Test Driven Development Deluxe.

The Interactive REPL is an essential tool in the Clojure & ClojureScript ecosystems. It is a superpower I’ve not seen before anywhere else. Once learned, it is something you’ll want in other languages too. But is that even possible, outside of a Lisp environment?

Evaluating vars, state and functions in real time with ClojureScript

Can we have that in Python too?

I think I have found something similar to the Clojure way of writing software, that works really well. You can pass an entire buffer, a selected region or a function from the code editor into a running IPython process, that quickly evaluates the code and prints the result. I have replaced the standard Python shell with IPython. I’ll explain why.

When evaluating code, IPython will output the result while the cursor remains in the code editor. That is what I mean with fast feedback loops. Evaluated functions, variables and imports can also be redefined - without having to restart anything. I’ve configured IPython to auto-reload sub modules when changed, to avoid having to restart the process. That feature is essential for this kind of workflow and the main reason why I’ve switched out the standard Python shell.

REPL Driven development in Python

It would be really cool to have the output pop up in the editor, right next to the actual code (as when evaluating Clojure or ClojureScript). I think that’s mainly a tooling thing, currently not available.

Also, I haven’t yet figured out how to connect to an actual running Python program and redefine functions or variables while the program is running (as you do in Clojure).

However, IPython is closely related to Jupyter, often referred to as an interactive notebook. There’s a thing called the kernel, handling code evaluation and returning result to connected clients. Sounds a bit like NRepl & Cider! I should probably dig deeper into and learn more about the possibilities with Jupyter.

Joyful Python

To summarize, even though there are some limitations, I think the REPL Driven Development workflow makes writing Python code joyful. The fast feedback loop is a great thing to have at your fingertips. Just like TDD, REPL Driven Development can be very helpful when writing testable, simplistic and functional code.

And it is fun too. 😁

Update: have a look at this post of mine from 2022, for more info about how to setup your code editor. You'll also find a 5-minute video in there about this style of development.


Top photo by Hitesh Choudhary on Unsplash

Monday, September 13, 2021

ClojureScript. Amplified.

"… we're going to build a web app with storage, authentication and everything …"

But how?

My favorite building blocks 🤩

I have tried out some tools that I find very useful. As you may have guessed, the code is developed with ClojureScript. A language I appreciate more each day. Developing an app, without the Interactive REPL? That would be taking a huge step backwards.

I have found that Material-UI works really well in the development of the app I'm working on. The components library cover many usage scenarios, it is well documented and there's a lot of code examples to learn from.

Recently, I added Storybook and really like the idea of developing user interfaces according to Component Driven Design. It reminds me of how I experiment with code using Test Driven Development. Just like TDD, I think tools like Storybook and Devcards changes the way we develop, to the better. Start small & build quality in.

Let's begin with a building block from my favorites list: AWS Amplify.

A basic setup for AWS Amplify & ClojureScript

The official AWS Amplify documentation is all about JavaScript. In this post, and in this example code repo, you will find a ClojureScript setup that I think will get you up & running quickly. First, set up AWS Amplify by following the first parts of the Official getting started guide. You will be creating an AWS account and installing a CLI to initialize your setup.

If want more details, have a look at Hey Webpack, Hey ClojureScript. It's a post describing a ClojureScript & Amplify specific setup that is used in the example repo.

Start coding, but where? 🤔

A pitfall might be where to place the auto generated client code from Amplify. I usually put files like the aws-exports.js at the same level as the root namespace.

In the example code repo, the ClojureScript source code lives in the src/main folder. That's also where I've added the aws-exports.js file.

Configure Amplify in the init function of your app.

Login & Logout with ClojureScript & the Amplify CLI

Adding authentication can easily be done by using the Amplify CLI.

From the docs:

"... The Amplify CLI supports configuring many different Authentication and Authorization workflows, including simple and advanced configurations of the login options, triggering Lambda functions during different lifecycle events, and administrative actions which you can optionally expose to your applications ..."

Use the Auth features in Amplify UI

There's a very useful Higher-Order React Component (aka HOC) in the AWS Amplify UI Library, that will render login and signup views.

I've chosen this less-lines-of-code approach by using the withAuthenticator HOC. To customize things like signup fields or styling, there is also a fully customizable Authorization component available in the Amplify UI library. Or you can use your own components.

The views entry point.
The passed in component is wrapped in the withAuthenticator HOC.

If you already have browsed the code in my example repo, you may have noticed the Reagent reactify-component and as-element functions. These functions are needed when passing components between ClojureScript and JavaScript.

Read more about React Components, elements and instances and how the interop is done with Reagent.

Create, read, update and delete

So far, we have used built in features that will render UI views and handle all auth communication with a backend service. To store, read and update data, we can use the Amplify API feature. Use the CLI to create a backend:

I have chosen GraphQL in my example code, but there's also a REST API option. When using GraphQL, all you need to do is to define data models. Amplify will create the backend infrastructure according to your models. In a matter of minutes, there are AWS AppSync endpoints & DynamoDB tables created for your app.

GraphQL

Here's a GraphQL model. An authenticated user should be able to add data to the profile, like a summary or an "About me" text. The user will be able to create, delete and update the data in the profile. Other authenticated users can read the data when they visit the user's profile.

The schema files belongs to the backend, and lives in the amplify folder of your repo.

async ClojureScript

The Amplify Client Library handles the communication with the backend services. All calls are asynchronous. In ClojureScript, you can use core.async. I haven't yet dig into the core.async stuff, so I'm using Promises here. I think it's a quite straight forward approach.

The data going through the wire is JSON. To make the developer experience better, I think it might be a good idea to add conversion functions to-and-from Clojure data structures. Like this one, converting user settings JSON to Clojure data:

Read more about the ^js type hints in ClojureScript.

Finally: Ship it! 🚢

Here's an excerpt from an amplify.yml that defines the build steps. If you add a definition file in your repo, AWS Amplify will use it in the CI/CD process.

This is the amplify.yml that I use in my example code repo.

There's more details at the official AWS docs about build settings and about amazon-linux-install.

Add UI building blocks to the amplified app

Now we have our amplified ClojureScript app. Let's add UI building blocks from Material-UI, a library that is very popular in the JavaScript & React ecosystem. Here, I'm using it via a ClojureScript library called reagent-material-ui. The library makes it possible to write components using Clojure data structures. You can read more about Material-UI and ClojureScript in my previous post Material Design in a Functional World.

Totally unnecessary css styling used here, but why not?

Testing the UI building blocks with ✨ Storybook ✨

I find Storybook very useful when experimenting with components and user interfaces in isolation. Being able to focus on one specific thing. There's many different aspects of developing an app, and it is sometimes difficult to handle all of them at the same time.

Storybook is a place for trying out things like css, styling, different viewports and UI events. You won't try out the AWS Amplify code here. The Interactive REPL is a better tool for that.

You'll find more about Storybook in Component Driven ClojureScript with Storybook.

Finally, check out my GitHub repo for ideas on how to create apps with the building blocks AWS Amplify, Material-UI, Storybook and ClojureScript.

That's a combination I'd like to call ✨ClojureScript. Amplified. ✨


Top photo by Drew Patrick Miller on Unsplash

Thursday, September 2, 2021

Material Design in a Functional World

"... Material is a design system created by Google to help teams build high-quality digital experiences for Android, iOS, Flutter, and the web ..."
from material.io

ClojureScript & React is A 💕 Story

With Clojure, you can write functional & minimalistic code. With ClojureScript and Reagent, you can write functional & minimalistic React components. By adding re-frame to it, we also have a powerful way of handling state changes and triggering events.

The code you write in ClojureScript is instantly compiled to JavaScript React components that runs in your browser. The entire JavaScript ecosystem is available with this kind of setup.

"... React components for faster and easier web development. ..."
from material-ui.com

Material-UI

Material-UI is a very popular React framework. And we can use it with ClojureScript. But the JavaScript interop can sometimes be bit of a hassle. Fortunately, there is a great ClojureScript library called reagent-material-ui that simplifies this a lot.

One thing to notice is that the Material-UI components use React Hooks heavily to inject styling and theming into components. This is something to think about when using Reagent. Basically, just use the functional component syntax [:f> my-component] and you’re all good.

Have a look at the reagent-material-ui docs about common pitfalls in the React/Reagent interop and a fully working example in this GitHub repo.

Storybook: a playground for components

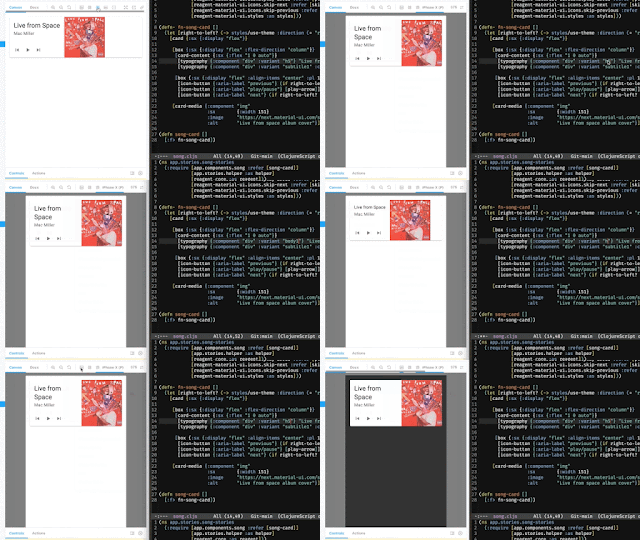
Here’s me playing around with the Card component, using ClojureScript and Storybook. I describe the Storybook integration in detail in this post.

The source code is available at GitHub.

No copy-paste?

I guess it can be a bit overwhelming for a Clojure developer to look at example code from the Material-UI site, with JavaScript/JSX syntax that is quite verbose (you’ll be even more overwhelmed by the TypeScript examples).

A JavaScript developer would probably copy-paste the example code and make some adjustments. We can’t do that. But it is worth the effort writing the code from scratch when discovering that the result is way more simplistic than the original. The amount of code written is usually half the size of the original JavaScript code. Yeah, that’s Clojure!

ClojureScript to the left, JavaScript to the right. Less is more.

Check out my GitHub repo with examples on how you can implement Material-UI components in ClojureScript, with hooks and styles - while having fun writing functional code.


Top photo by Thierry Lemaitre on Unsplash